Gourmet Pear, Blue Cheese and Serrano Ham Flatbread.
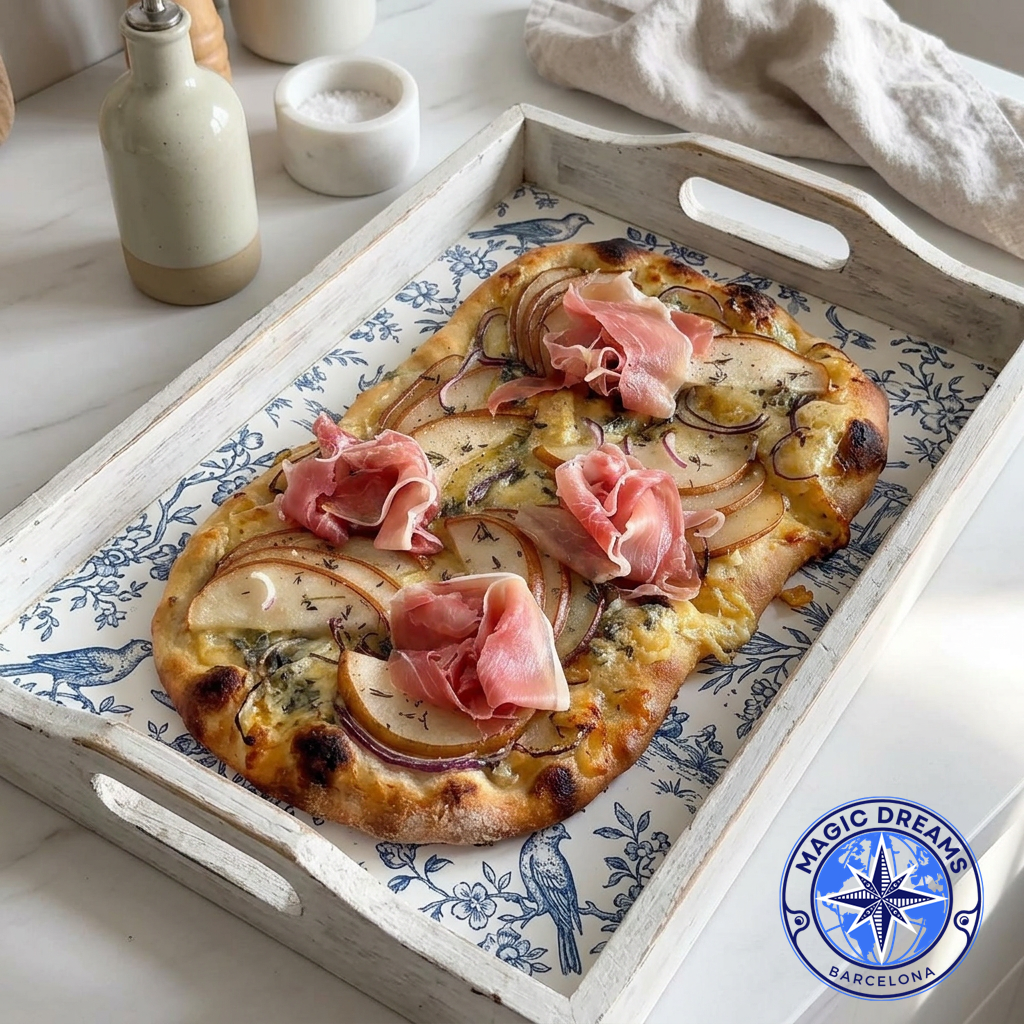
A Fusion of Italian Tradition and Mediterranean Flavors
The combination of pear, blue cheese, and cured ham belongs to that small group of gastronomic pairings that seem as though they have existed forever. The delicate sweetness of the fruit, the salty intensity of the cheese, and the depth of the cured ham create an elegant contrast between sweet, savory, creamy, and slightly spicy notes.
Inspired by the Italian tradition of pinsa romana and reinterpreted with Mediterranean ingredients, this version transforms a simple flatbread into a sophisticated gastronomic experience.
The key is to work with a light, crispy dough, bake the base first with the cheese and pear, and add the Serrano ham at the end, when the residual heat allows its aromas to develop without drying it out.
The result is a pinsa with golden, crispy edges, a light interior, melted cheese, slightly caramelized pear, and delicate Serrano ham flowers.
Ingredients
For the Homemade Dough
- 300 g strong bread flour
- 50 g rice flour
- 50 g wheat flour
- 300–320 ml cold water
- 3 g dry baker’s yeast
- 8 g salt
- 10 ml extra virgin olive oil
- 1 teaspoon honey
Note: The hydration level is relatively high. The dough will be wetter and stickier than traditional pizza dough. This high hydration helps achieve a light and airy texture.
For the Topping
- 2 firm but ripe pears
- 120 g blue cheese, preferably Gorgonzola
- 100 g good-quality mozzarella
- 50 g Camembert or soft cream cheese, optional
- 80–100 g thinly sliced Serrano ham
- ½ red onion
- 4–5 sprigs fresh thyme
- 1 tablespoon extra virgin olive oil
- Freshly ground black pepper
For the Gourmet Finish
- 1 teaspoon honey
- 1 teaspoon extra virgin olive oil
- A few fresh thyme leaves
- Freshly ground black pepper
- A small handful of toasted walnuts, optional
- A few drops of balsamic reduction, optional
Step-by-Step Preparation
1. Prepare the Dough
In a large bowl, combine the bread flour, rice flour, and wheat flour.
Dissolve the yeast and honey in approximately 280 ml of the cold water.
Gradually pour the liquid into the flours while mixing with a wooden spoon or your hands.
Do not add all the water at once. Depending on the flour’s absorption capacity, you may need slightly less or slightly more.
Once the dough begins to come together, add the salt and olive oil.
Continue mixing until you have a very moist and fairly sticky dough.
There is no need to add excessive amounts of flour.
2. Knead
Place the dough on a lightly moistened or lightly oiled work surface.
Perform gentle folds for a few minutes.
Lift one side of the dough, stretch it gently, and fold it toward the center.
Repeat the process from different sides.
After several folds, the dough will begin to develop a more elastic and uniform structure.
Shape it into a ball and place it in a lightly oiled bowl.
Cover with plastic wrap or a damp cloth.
3. Slow Fermentation
For a more aromatic and lighter dough, let it ferment in the refrigerator for 18–24 hours.
This slow fermentation allows more complex flavors to develop and significantly improves the final texture.
If you need to prepare the pinsa the same day, you can let it ferment for approximately 2–3 hours at room temperature, although the final flavor will be less developed.
4. Shape the Pinsa
Remove the dough from the refrigerator approximately one hour before using it.
Divide it into two portions.
Place one portion on a well-floured surface.
Using your fingertips, gently stretch the dough from the center toward the edges.
Do not use a rolling pin.
The goal is to preserve some of the air generated during fermentation.
Shape it into an elongated, irregular piece, characteristic of pinsa.
The edges should remain slightly thicker than the center.
5. Prepare the Pear
Wash and dry the pears.
Cut them into very thin slices.
There is no need to peel them if the skin is in good condition.
For a more elegant presentation, cut some slices into full rounds and others into half-moons.
Place them on paper towels for a few minutes to remove excess moisture.
This small step helps prevent the dough from becoming too wet during baking.
6. Prepare the Onion
Cut the red onion into extremely thin strips.
If you prefer a more delicate flavor, you can soak it in cold water for a few minutes and then dry it thoroughly.
The onion will provide a subtle spicy contrast and a beautiful purple color to the dish.
7. First Bake
Preheat the oven to 240–250°C / 465–480°F, ideally with a baking tray or pizza stone inside.
Place the pinsa on parchment paper.
Lightly brush the surface with extra virgin olive oil.
Bake the base for approximately 5–7 minutes.
The dough should begin to puff up and develop some color, but it should not yet be completely baked.
8. Add the Cheeses
Remove the pinsa from the oven.
Distribute the mozzarella irregularly across the surface.
Add small pieces of Gorgonzola and, if using, a few small pieces of Camembert.
Do not cover the entire surface.
The irregular distribution will allow each bite to have different levels of cheese intensity.
9. Add the Pear and Onion
Arrange the pear slices over the cheese.
Place small amounts of red onion between them.
Add a few fresh thyme leaves and a small amount of freshly ground black pepper.
There is no need to add much salt, as both the blue cheese and Serrano ham will contribute considerable saltiness.
10. Bake
Return the pinsa to the oven.
Bake for approximately 5–8 minutes, until:
- The edges are deeply golden.
- The cheese is completely melted.
- The pear is lightly roasted.
- The base is crisp.
- The surface develops small caramelized areas.
The exact baking time will depend on the power of your oven and the thickness of the dough.
11. The Serrano Ham Moment
Remove the pinsa from the oven and let it rest for approximately one minute.
This step is important.
The Serrano ham should not be baked for too long, as it would lose some of its delicate texture and aromas.
Arrange the slices over the pinsa, forming small flowers or natural folds.
The heat from the surface will cause the fat in the ham to melt slightly.
The contrast between the hot cheese, warm pear, and freshly added ham is one of the most elegant elements of the recipe.
12. The Gourmet Finish
For a more sophisticated finish, drizzle a few drops of honey over the pear and cheese.
There is no need to use a large amount.
The honey should act as an accent rather than a dominant ingredient.
Add a few fresh thyme leaves, freshly ground black pepper, and a very fine drizzle of extra virgin olive oil.
If you want to add another layer of contrast, finish with a few lightly crushed toasted walnuts.
A small amount of balsamic reduction can also be used, although it should be added sparingly so it does not overpower the flavor of the pear and cheese.
Gourmet Presentation
Place the pinsa on a wooden board, handcrafted ceramic platter, or stone surface.
For an especially elegant presentation, arrange the Serrano ham flowers irregularly, leaving the pear slices and melted cheese visible.
Finish with:
fresh thyme + black pepper + honey + extra virgin olive oil.
The combination of colors is particularly attractive:
golden dough, white mozzarella, blue-green cheese, green thyme, purple onion, yellow pear, and rosy-red Serrano ham.
The Balance of Flavors
This pinsa works because each ingredient plays a specific role.
The Pear
It provides sweetness, freshness, and moisture, along with a subtle floral character.
The Blue Cheese
It provides intensity, saltiness, and depth.
The Mozzarella
It softens the character of the blue cheese while providing elasticity and creaminess.
The Serrano Ham
It introduces cured, salty, and umami notes.
The Red Onion
It provides a subtle spicy contrast and a crisp texture.
The Thyme
It connects all the elements with a Mediterranean aromatic note.
The Honey
It rounds out the combination and enhances the caramelized character of the pear.
The Secret to Homemade Dough
The difference between an ordinary pinsa and a truly special one begins with the dough.
Three elements are particularly important:
hydration, fermentation, and temperature.
A well-hydrated dough helps create a light, airy, open crumb.
Slow fermentation develops flavor and improves the structure.
And a very hot oven allows the surface to brown quickly without completely drying out the interior.
That is why it is best not to rush the fermentation or add large amounts of flour simply to combat the dough’s stickiness.
The Secret to the Pear
The pear should not remain completely raw, nor should it turn into a purée.
The goal is to achieve an intermediate texture:
tender in the center, slightly caramelized around the edges, and still recognizable when bitten.
Firm, aromatic pear varieties work especially well.
An overly ripe pear can release too much moisture and make it more difficult to bake the dough properly.
The Secret to the Blue Cheese
The blue cheese should add personality without overpowering the dish.
Gorgonzola Dolce is particularly suitable because it offers a creamy texture and a more delicate character than some other blue cheeses.
For a more intense version, Gorgonzola Piccante can be used.
Roquefort also works, although its flavor is considerably more pronounced.
An especially well-balanced combination is:
mozzarella + Gorgonzola + a small amount of Camembert.
The mozzarella provides softness, the Gorgonzola adds depth, and the Camembert contributes a creamy, rounded texture.
An Even More Gourmet Version
To turn this pinsa into a restaurant-style dish, you can add at the end:
- Toasted Piedmontese or Spanish walnuts.
- A few drops of rosemary honey.
- Very finely grated lemon zest.
- Baby greens.
- Arbequina extra virgin olive oil.
- A few drops of balsamic reduction.
Another particularly elegant option is to add very thin slices of fresh pear immediately after baking, alongside the roasted pear.
This creates an interesting contrast between:
warm caramelized pear + fresh, crisp pear.
Pairing
This pinsa pairs especially well with an aromatic white wine with good acidity.
A dry Riesling, a lightly oaked Chardonnay, or a 0.0% alcohol-free sparkling wine can perfectly balance the richness and saltiness of the cheese and ham.
For a Catalan option, a 0.0% alcohol-free Cava Brut Nature offers a particularly elegant combination thanks to its acidity and bubbles.
It can also be served with a saison-style craft beer or a light 0.0% alcohol-free wheat beer.
The Final Result
The pinsa should reach the table hot, but not excessively hot.
The dough should be:
crispy on the outside, light on the inside, and slightly airy.
The cheese should be melted and creamy.
The pear should show small caramelized edges.
The onion should provide color and a subtle contrast.
And the Serrano ham should retain its silky texture and characteristic aromas.
The final touch of honey brings all the elements together and transforms the combination into a surprisingly balanced dish.
A Pinsa to Share
This recipe works especially well as a sharing dish.
Cut it into diagonal pieces and serve it as an elegant appetizer, accompanied by a salad of bitter greens, arugula, and walnuts.
It can also be part of a gourmet table alongside:
- Cheese board.
- Iberian cured meats.
- Olives.
- Seasonal salad.
- Roasted vegetables.
- 0.0% alcohol-free Cava or white wine.
The combination of sweet, savory, creamy, crisp, and aromatic flavors turns every slice into a small gastronomic experience.
The Final Touch
Just before serving, place the last few thyme leaves over the pinsa.
Add an extremely fine drizzle of honey and a few drops of extra virgin olive oil.
Finish with freshly ground black pepper.
Cut the pinsa and serve immediately.
The result is an Italian-inspired flatbread with a Mediterranean soul: crisp, creamy, aromatic, and sophisticated, where pear, blue cheese, and Serrano ham find a perfect balance between sweetness, intensity, and saltiness.
Copyright © 2016-2026 Magic Dreams Barcelona.